by Richard Viets | Apr 23, 2024 | Security
The option to require two-factor authentication (2FA) for increased login security is now available for all account types other than the legacy Personal Edition. When turned on by the Group Administrator an Authorization PIN will be delivered via email or text (or both, letting the user chose the method each time the user logs in).
Important details include:
- Delivery of the PIN via email is the basic method, and assumes the email address associated with each user is accurate.
- Optional mobile numbers may be set by either users or the Group Administrator. Those users with a mobile number set will choose Authentication PIN delivery via email or text at each login.
- When 2FA is enabled ALL users in multi-user accounts will be required to use 2FA.
- When 2FA is enabled access will be limited to the browser interface only, as other methods of account access cannot support 2FA. Turning on 2FA means users will not be able to use Web Folders, the Desktop App, or SDK-based batch programs.
- Administrators should consider running the Two Factor Report found at Group Administration…Tools & Reports to learn what email address is associated with each account and which users have a mobile number set.
- 2FA does NOT change how the Customer Upload and Share links work.
Administrators use Group Administration…Group Settings…Two-Factor Authentication to turn the feature on or off.
Administrators use Group Administration…Group Users Administration to set or change a user’s email address and mobile number using the Action Menu for a user.
If User Update is set to “Admin or User” then Settings…Mobile Number can be used by each User ID in the group account. Group Administrators also use Settings…Mobile Number to set their own mobile number
by Julie Campbell | Jun 19, 2020 | Customer Upload, New Features, Security
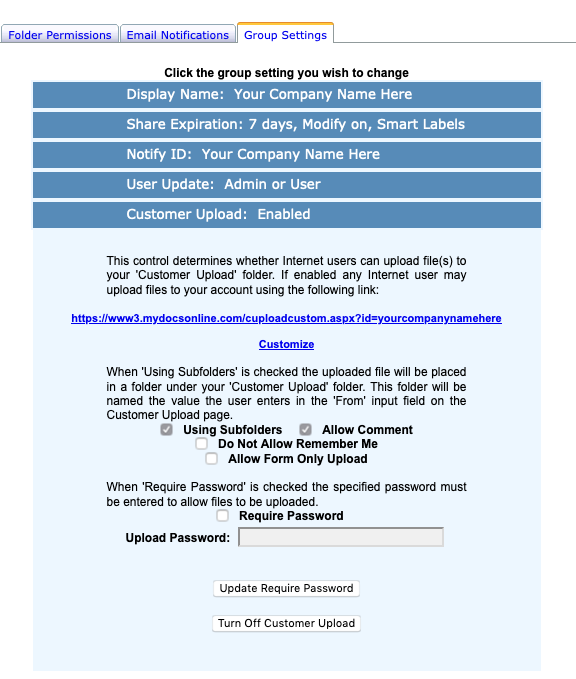
Many professionals need a secure way to receive files from their clients, patients, students, customers, associates and the like. MYDOCSONLINE just released an optional password-protected Customer Upload feature. Each account now has a checkbox “Require Password” in the Group Administration–>Group Settings–> Customer Upload plus a field to enter the password. Refer to our screen display below.
The password is visible to make it easier to recall. The password of course must be provided to anyone doing an upload. It is up to the Administrator to communicate the password verbally or secure method to individuals that are uploading files.
If the “Required Password” option is selected then the link changes from cuploadcustom.aspx to cuploadpw.asx. Though, if the regular link is used with the “Require Password” turned ON then the link gets redirected to the password protected link. As a result, there is no need to change the regular link as posted on web pages or sent in emails.
Our public UPLOAD feature is referred to as “Customer Upload” and is enabled for all accounts at start up. Should you not want to use this feature you may simply disable the feature. The Customer Upload feature permits any file type and any file size to be transferred securely into your account by individual from any computer, laptop, iPad or mobile device. You now can turn ON the new password feature to prevent unwanted files from being uploaded into your account should you make your Upload page visible on a website or public document.
To learn more about our Customer Upload feature click HERE.
This feature is being used by professionals in the loan and financial industries, educational institutions, law and accounting practices to name a few. To better understand how we can help your needs please email [email protected] or give us a call at 239.495.1181.
by Richard Viets | May 1, 2020 | Customer Upload, Uncategorized
Website developers wanting to embed Customer Upload into a website use an iFrame along with the logo=no parm.
IMPORTANT! My Docs Online Customer Upload provides you with a SECURE (HTTPS) link to reassure your customers that their files are protected during upload. If you embed Customer Upload into your website using this method, and your own website is not itself secured via HTTPS your users will be warned by most browsers that their session is “Not Secure”. Even though the embedded My Docs Online portion is itself secure, your customer will perceive it is not secure.
If your website does not use HTTPS and providing a clearly secure upload for your customers is important, you should NOT embed Customer Upload using this method. Instead, link to your Customer Upload page, and customize it with your logo to “brand” it. That way browsers will inform your users that your Customer Upload page is secure.
For embedding details using iFrame see this FAQ article.
To find your account’s Customer Upload link and customization options:
- Login here with your Admin ID: https://www.mydocsonline.com/securelogin.html
- Click Group Administration–>Group Settings–>Customer Upload
- View and test your Custom Customer Upload link
- Click “Customize” to access available options, as described in this blog post
by Richard Viets | May 1, 2020 | Customer Upload, Uncategorized
(For general information on Customer Upload features and customization see this post.)
The My Docs Online Customer Upload feature has long included the ability to create “departmental” subfolders under \Customer Upload with unique links. The feature is usually coupled with folder permissions and notification options associated with a particular Login ID.
Now these links also include the ability to customize the upload form separately from the main Customer Upload link and other “departmental” links.
Although all Customer Upload forms share the same custom logo, all other fields and options are now unique to the subfolder, including instructions, optional fields, prompts, file type rules, and more.
To set up a departmental upload link and customize it follow these steps:
- login with your Administrator ID using the browser interface
- Open the \Customer Upload folder (if you don’t yet have that folder create it with “Create Folder” and then open it
- While in \Customer Upload use “Create Folder” to add the departmental folder
- Select “Details” from the Action menu for the departmental folder
You will see two things in the details dialog: the unique link and a link to “Customize upload form for this link”. Clicking the link will take you to the customization wizard for the departmental folder, which is the same as the regular Customer Upload customization, with the exception of logo upload.
The departmental upload link can be used on a website or in emails. Remember to use folder permissions and email notifications for the departmental folder as desired.
by Julie Campbell | Oct 25, 2019 | Customer Upload
You ask –“I’m in the financial industry and I need a link in my email for clients to upload documents, how can I do that?”
Each MYDOCSONLINE account comes with a public Upload link that we can brand for you, or you can brand yourself through our step-by-step online branding assistant. You can take your Upload link and post in your email or even place it on your website. It’s secure and a professional way to receive files into your secure account. There is no programming on your part. The page is created automatically when you setup your account. The public upload link is LIVE and ready to share when you need it. File encryption is enabled automatically so there are no extra steps for you to take to get started.
Clients never need a User ID or password to upload files into your private account. Clients do not need to sign-up for their own MYDOCSONLINE account to send you files like other systems require. Our service is very user friendly.
File types do not matter unless you program your Upload link to only receive certain file types. Restrict certain file types or leave it so you can receive any file type. It’s up to you!
Your public upload page is customizable to your business needs. This allows you to create a couple of extra fields that are specific to your industry to get the information you require from clients to keep the workflow moving forward. You can even embed the page on your web site.
Upload page customization supports:
- Uploading, aligning, and sizing your own logo.
- Adding a custom “instructions” section to tell your customers what you will do after you receive customer files.
- Customization of prompts for each of five form fields, one required (identifying who is sending the files, which becomes the subfolder name the files are uploaded to), and four optional fields, including email and comment, plus two more you can define yourself.
- Optional “I am not a robot” processing using Google’s reCAPTCHA checkbox. You want to receive customer files, not files from a robot.
- Customizable “Upload Complete” message.
- Optional confirmation email to your customer, with customizable subject, message body, and optional list of files uploaded.
- Optional “file type whitelist” to restrict uploads to types of files you specify (for instance image files only:.pdf, .png, jpeg, .jpg, .tif, ,tiff)
- Notification email (and notification flag) to you using standard My Docs Online email notification.
- In the My Docs Online browser interface “Action:Details” for any file received via Customer Upload now includes all the information from the form your customer completed when doing the upload.
- Optional link to a specific subfolder under \Customer Upload, enabling unique links (as well as notifications and permissions) for individuals or groups/departments within your organization.
- Mobile Friendly upload alternative link displays for all mobile devices to allow for faster uploads.
For additional information and a video demo go to: https://mydocsonline.com/info_customer_upload-html/
We respect your privacy and protect your clients information. The public Upload link is where SECURITY meets SIMPLICITY as you do business online!
MYDOCSONLINE Login Here
START FREE MYDOCSONLINE TRIAL Here
by Julie Campbell | Oct 25, 2019 | Security

A common question we get asked by businesses is “How is the data stored in mydocsonline.com protected?
By default all My Docs Online sessions use secure HTTPS and TLS (Transport Layer Security) processing. This ensures that files being uploaded and downloaded across the Internet are encrypted for added privacy.
Files on our servers also employ “Encryption At Rest”. This means that even in the unlikely event that stored files would be misplaced or stolen they are encrypted with AES-256. In addition, the three components of Encryption At Rest (encrypted files, encryption keys, and encryption/decryption processing) are each on separate servers.
The My Docs Online site has several layers of data security to provide access control:
- The My Docs Online web servers are deployed using a dual-homed configuration, thus providing specialized, application-specific firewall protection to our private network. This extra layer of security is specifically designed to keep your files and other information safe.
- All user files are safely stored on the My Docs Online private network servers. These servers are machines that are physically isolated from the public Internet, for security purposes.
Physical security is provided by a “hardened” facility providing seamless connectivity, guaranteed uptime, and security.
All files are stored on RAID devices, which in turn are replicated to an additional RAID storage subsystem, providing exceptional data integrity.
By design, files deleted by a user are first marked “pending delete” for approximately 72 hours, during which time they are available for “undelete” by the user. Following this “grace period” all copies of a deleted file are permanently removed from My Docs Online servers. No “backup copies” are kept.
Customers who require backup of their files are provided with tools to back up their files to a server at their location.
My Docs Online does not disclose details regarding hardware or software used, to protect its servers, customer files and information. For security reasons we do not share this type of information but if you do have questions about file security, or account security then please email us at: [email protected].
by Richard Viets | Sep 16, 2019 | Dropbox, General Information

You ask, “How do I move files to Dropbox?”
By using our free MDO SDK tool you can easily transfer your MYDOCSONLINE files into your Dropbox account.
It’s as simple as copying a MYDOCSONLINE folder to your local Dropbox folder, which in turn causes Dropbox to copy your files to the Dropbox cloud.
A MYDOCSONLINE Support Team Member writes the SDK configuration script for you. Next, you install it on your PC. You may run it manually or automate it with Windows Scheduler to run daily. It’s that easy!
We won’t need any Dropbox credentials (ID and password) because we use the local PC Dropbox folder as the intermediary.
Contact [email protected] to get started today!
by Richard Viets | Jul 23, 2018 | Customer Upload
Our Customer Upload feature is used to receive customer files, securely, and easily. The most recent round of enhancements to Customer Upload adds more customization options then ever before using a Customization Wizard that walks you through each option, with a live preview along the way.
Customization now supports:
- Uploading, aligning, and sizing your own logo
- Adding a custom “instructions” section to tell your customers what you will do after you receive customer files
- Customization of prompts for each of five form fields, one required (identifying who is sending the files, which becomes the subfolder name the files are uploaded to), and four optional fields, including email and comment, plus two more you can define yourself
- Optional “I am not a robot” processing using Google’s reCAPTCHA checkbox. You want to receive customer files, not files from a robot
- Customizable “Upload Complete” message
- Optional confirmation email to your customer, with customizable subject, message body, and optional list of files uploaded
- Optional “file type whitelist” to restrict uploads to types of files you specify (for instance image files only:.pdf, .png, jpeg, .jpg, .tif, ,tiff)
- Notification email (and notification flag) to you using standard My Docs Online email notification
- In the My Docs Online browser interface “Action:Details” for any file received via Customer Upload now includes all the information from the form your customer completed when doing the upload
- Optional link to a specific subfolder under \Customer Upload, enabling unique links (as well as notifications and permissions) for individuals or groups/departments within your organization
Customer Upload can also be “embedded” in your website (only do this if your site uses https: to avoid browser warnings).
To view your new customer upload link and access the Customization Wizard:
As always, contact us with any questions or issues, or for hands-on help with customization.
by Richard Viets | Dec 15, 2017 | Accountants
One of the key features of My Docs Online used by Accountants during tax season is Customer Upload, which gives them a secure, efficient, and client-friendly way to electronically receive key client files. Customer Upload is easy to set up as a branded, standalone page displaying the Accountant’s logo, or it can be embedded in the Accountant’s own web site.

An easy solution for accountants to get income tax documents
HOW IT’S DONE
Share the secure HTML link to your MYDOCSONLINE Customer Upload page in emails, or embed the upload link on your web site.
There are no User IDs or Passwords required for clients to Upload tax files. Your clients can use the easy “Drag and Drop” zone to upload files into your account. There is also a “Browse” option for client to upload files from their computer into your account. Easy file uploads and progress bars makes it simple to see when file upload is complete. Upload email notifications are automatically sent to your Inbox as client tax files arrive into your MYDOCSONLINE account.
Receiving client files through a professional Customer Upload web page for tax season is truly simple!
When your accounting firm is ready to send IRS e-signature forms you simply upload your document into your MYDOCSONLINE account and use the secure SHARE feature. It’s very easy to do! Your client receives an email with a secure link to download and print or view the document.
TRACKING YOUR TAX DOCUMENTS
Your MYDOCSONLINE account allows you to track SHARED documents with a date and time stamp, and IP address as to where the document was downloaded to. There is no more second guessing if your document made it to your client in time.
FREE PROFESSIONAL ACCOUNT BRANDING
Professional free branding design gives your page a polished look to match your business site and brand. In addition to “branding” your Customer Upload page with your logo, additional instructions can be added to your page to further customize your Accounting firms specific document requirements. Send us your logo, let us know your requirements, and we do the branding work for you! Same day turn around too!
SECURITY
We keep your client tax files secure and private. HTTPS and Transport Layer security is used for all MYDOCSONLINE accounts. For further details go to our MYDOCSONLINE Security page at: https://mydocsonline.com/security-html/
Setup an account to quickly close email security loop holes in receiving tax files from your clients.
Go to https://mydocsonline.com/free-trial/ or call us during east coast business hours. MYDOCSONLINE Call Center: 239.495.1181
by Richard Viets | Jun 8, 2016 | Medical Transcription

Some doctors are now asking MTs to enter the data directly into their EMR (electronic medical records) system. When considering offering this service transcription services should consider the following:
Cloud or Premises EMR?
First, is the EMR cloud-based or installed on the premises? And what is the name of the product? Find this out and do a web search on the product to learn the basics. If you are able to visit the doctor’s office get a demo.
If it’s a cloud-based system that can be accessed via a web browser across the internet you will need a login for the practice in order to enter data.
If the EMR is installed on the premises remote access is more complicated, at least in the initial setup phase. The typical solution is to use a VPN (virtual private network). If they don’t have a VPN already their IT staff would have to deploy one. The MT will likely have to install or configure additional software themselves. As an alternative to a full-blown VPN you might consider using a remote desktop application such as Microsoft’s free Remote Desktop Connection.
After you solve the connectivity problem there remain other issues to consider. The first is training on the EMR. How will you get trained and how much time will you have to invest?
Getting Paid For Extra Workload
 The second, more long-term issue is how much extra time, on average, will it take you to enter data into an EMR versus typing up a note? Most MTs charge by the line but when you are entering data into an EMR there aren’t really any “lines”. In general, for the MT to be properly compensated for the extra time it takes to enter data into an EMR the MT will want to charge more for each dictated “note” (but of course the doctor will want to continue paying the same as before). (more…)